There are six ways to take a screenshot on the Oppo Reno8 Pro plus phone and a few more best tips tricks and cool hidden features to quickly get a screenshot.
They are different and differ from the phone model. You can capture a screenshot using the Volume Down and Power buttons or the Power button and touch the phone screen. Or you can do it without buttons. For example, using three-fingers swipe down the screen programs from Google Play or using the built-in (brand) app. Well, if the screenshot doesn't work, you can try Google Assistant or Screenshot Capture shortcut icon at notification bar.
We know you're clever. This is why there will be no teaching like select the screen you want to save or turn on your device. No crap. Only the required information how to make a screenshot on the Oppo Reno8 Pro plus phone.
Use buttons
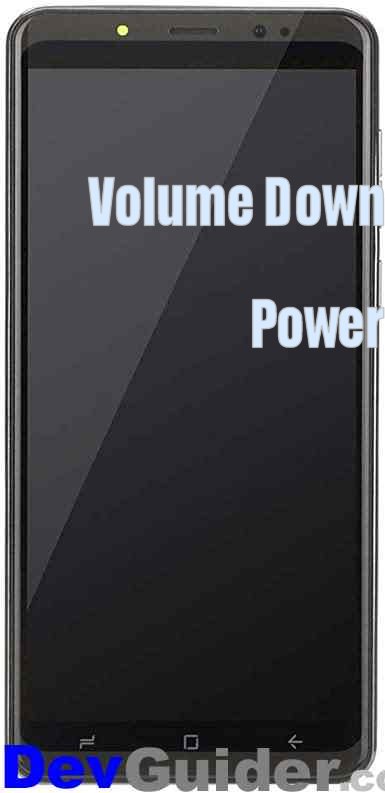
The quickest way to take a screenshot is to use the buttons. Simultaneously press the Volume Down and Power buttons and keep them pressed until the screenshot is captured. You can also use this method to screenshot with scroll.
If the main way to take a screenshot not work and you can't find picture we'll try other options.
Three-finger swipe
Swipe three fingers down the screen to get a screenshot. The place of swipe is not crucial. This method is applied in ColorOS.
Long screenshot
To take a long screenshot, just click on the proper icon. You will see this icon after you have taken a ordinary screenshot. This method can also be called to make a scrolling screenshot.
Use apps
You can use additional screenshot apps which are very much in Google Play: Screenshot Pro, Screen Master, Private Screenshots, Screenshot touch, Screenshot Easy etc... They all have instructions on how to use them to take a screenshot and save the picture.
Google Assistant
The laziest option is to use Google Assistant. Just say OK Google and then Take a screenshot. The gadget will do all the work for you.
Use Capture icon
Another way is to use the built-in capabilities of the phone. Swipe down on the display to open the notification bar. Locate the screenshot icon (shortcut) and tap on it to take a picture. It's done. You got the picture.
How can I share my screenshots? Depending on the Android version and the built-in UI, sending screenshots may differ. In recent versions of Android (9 or 10), the smart menu will appear after you take a screenshot immediately. There you need to select the appropriate icon for sharing. Or just open the gallery app on your gadget.
Where are my screenshots? If you can't find the screenshots you took, don't despair. The gadget can save screenshots to different folders. Again, it all depends on custom shells. A pure Android throws pictures into the gallery (DCIM). Other shells can save screenshots to a different folder for your convenience. These methods work with gadgets of all operators.
T-Mobile
TracFone
Virgin mobile
Sprint
Metro
Verizon Wireless
Cricket Wireless
AT&T
Simple Mobile
Oppo Reno8 Pro plus has a screen resolution 1080 x 2412 pixels. And so the screenshot will be the same size. And the file size will be 0.3 megabytes, so count how much space you need in your phone's memory or on your microSD card. The images or video in this post may not exactly match your phone model. However, they have typical parts that will help you get the required result.